OK, my first stab at a tutorial. I had been wanting to create a bag from old blue jeans but didn’t want to spend a lot of money buying a pair. I have been reading other blogs about thrifting where the blogger bought clothes and craft supplies for $.25, $.50, etc. in thrift shops. We must have a higher class of stores because the least I could find was for $5.00. Where oh where is the rummage sale I used to help with at my church in New England— pants were no more than $.50 each!! Well, a neighbor had a yard sale and I bought a pair of her little girl’s jeans, about a size 5 I think.

Girl's jeans
The pair of pants even had side pockets on the jeans. I cut those off and will make a phone or iPod carrier with them later.
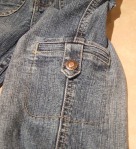
Side Pocket
Pin the waistband together with the top edges even. This will keep it from shifting when cutting off the legs. Draw a line across the body of the jeans just above the crotch and enough below the back pockets for a seam allowance.Cut along the this line.
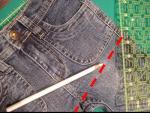
Cut along red dashed line
Be sure to leave enough below the back pockets for a seam allowance. I had only about 1/4″.
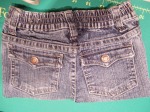
Back of jeans after cutting
The depth of the pants from the waist to the crotch was too short for a purse (for me anyway) so I decided to extend the length with extra fabric. I had a placemat with matching napkins I wasn’t using so I used the placemat for the bottom of the outside of the purse and used the napkins for the inside pockets, including a zippered pocket.
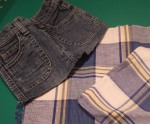
Top of cut off jeans, placemat, napkin
Measure the diameter of the bottom of the cut off jeans. Divide by 2 and add 1″ for seams (assuming 1/2″ seams); this will be your width. Decide on how much extra length you want for the bag and add 1′ for seams and 1 1/2″ for the bottom ; this will be your height. Cut out your pieces and stitch along the two “height” sides and along one of the “width” sides. My placemats were unraveling like crazy so I had to zig-zag the edges.Red dashed line indicates seam line.
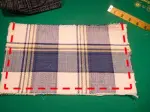
Stitch along red dashed lines
I wanted a boxy bottom. To do this, form a triangle by aligning the side and bottom seams together at the corners of the bottom piece; be sure the seams are pressed open. I wanted a 3″ wide bottom so I measure up from the tip of the triangle 1 1/2″ (remember your geometry?) to determine my seam line.
Craftapple has a tutorial that might explain it better.
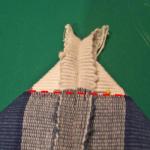
Stitch on red dashed line
Trim off the triangular tab. Zig-zag edge.
Sew the bottom (placemat) to the cutoff jean top, right sides together matching side seams and stitch together. I used a 1/4″ seam since that was the amount I had to work with (see the part about cutting off below the back pockets). I pressed the seam toward the bottom and then topstitched to keep in place. I also decided to add yellow bias tape on top of this seam as decoration. The picture does not show this since I decided to stitch the trim on much later in the process. Best to do it now.

Top and bottom sewn together
Now it is time to create the lining. Height (H)= measurement from the top of the bag down to the seam at the bottom of the bag + 1″ for seams. I actually added a little more and fudged with it later. Remember, if you decide to make your own all the measurements depend on the size of jeans you are using. Width

= diameter of bag/2 + 1″ for seams. For my bag H =15″ and W = 13″. Cut 2 piece of lining and 2 pieces of thin batting. Baste the batting to the wrong side of lining.
We are going to create a double pocket on one side of the lining (I used one of the matching napkins). The pocket will be the width

of the lining and a depth (D) = to your liking times two + 1″ for seams. Fold right sides together so that your piece measures W by D. Stitch along the edge opposite the folded edge using a 1/2″ seam. Turn inside out and place on lining. I placed it 2″ above the bottom of the lining so that it would just touch the bottom of the bag when completed. Remember, my bag was going to have a 3″ bottom, so 1/2 of that is 1 1/2″ and then added 1/2″ seam allowance.

Stitch along dashed lines
Now we are going to do a zippered inner pocket using the other piece of lining. There is an excellent tutorial
here at U-Handblog and explains it much better than I can. Instead of using 2 pieces of the pocket lining, I just doubled the depth and folded it up after stitching in the zipper. I will, however, try to explain. I cut the lining 9″ x 14″. I placed the top of the pocket lining about 3″ down from the top of the lining, centering and right sides together. About 2″ down from the top of the pocket lining, draw a line centered on the pocket lining 7″ long (the length of my zipper). Draw a line 1/2″ above and below that line. Form a rectangle using those lines and stitch. Cut at the middle line and little triangles (see below picture). P.S.
Sew, Mama, Sew has the instructions for the slip pocket, the zipper pocket, and how to insert a magnetic clasp.
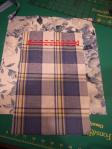
Pocket Lining
Here is a closer view.

Stitch along dashed lines and cut along solid line
Push pocket lining through to wrong side of purse lining and press.

close up after pressed
Insert zipper behind the opening you just formed, pin, and stitch along the edge of the opening.

Zipper sewn in
View of wrong side after zipper is sewn in.
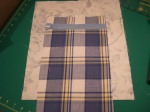
Back of purse lining
Fold bottom edge of pocket lining up to match top edge to form a 9″ x 7″ rectangle. Stitch along the 3 non-folded edges. Put the two purse lining pieces right sides together and stitch along the two side seams and along the bottom. Form a boxy bottom as described above.
This is a picture of the lining with the double pocket side.
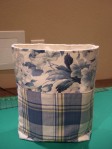
double pocket side of lining
and here is a picture of the zippered pocket side of the lining. The magnetic snap should be inserted here as described in the above link.
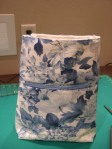
zippered pocket side of lining
I used yellow bias binding for a trim over the seam joining the jean top and the placemat bottom so I used it also for the tabs on the sides of the purse that the strap handle will be connected to using some quick links I got at Home Depot. Decide how long you want the tabs, multiply by 4 and then add 2″ for seams. Fold over the bias once with wrong sides together, ends even and edge stitch. Fold in half again and attach to the jean top section using the 1″ seam. Reinforce well, stitching in an “X” pattern.
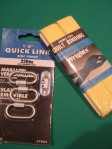
Quick Links and Bias Tape used
Do a dry fit of the lining inside of the outer purse. I had to do some fudging of the lining by adjusting the side seams to make it fit well. Fold over the top of the lining and sew the lining to the jean purse, wrong sides together. I left a little of the lining peaking over the edge to make it look like piping. The thickness of the waistband on the jeans and the lining was too much for my machine so I had to hand sew the lining in.
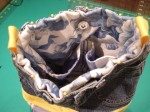
Lining pinned inside the purse
For the straps I cut strips 2″ wide from the leg, enough so that when pieced together it made a 2″ x 44″ piece. Also cut a 2″ x 44″ from the lining fabric. Fold the long edges of each piece to the center. This makes the strap 1″ wide, which will fit through the quick link.

Strap pieces, long sides folded to the center
Pin the wrong sides together of the strap pieces and edge stitch.

Strap pieces sewn together
Fold over end about 1/2″ and then fold over again about 3/4″ to form the casing to insert the quick link.

Ends of Strap
Attach strap to the yellow tabs on the purse and you are done!!
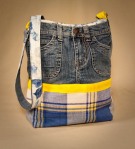
Finished purse

Inside of finished purse
I can tell you this, writing a tutorial is hard work!! I had to keep remembering to take pictures as I was sewing. Also, I have no list of pieces to cut out since I made this up as I went.


9 comments
Comments feed for this article
July 16, 2009 at 11:29 pm
Barb
Wow, this is really cute! I’ll blog about it for a future challenge on my purse blog http://iwannanewbag.blogspot.com
July 17, 2009 at 8:09 am
sewandsew
I am glad you liked it! Thanks for your comment.
November 12, 2009 at 11:52 am
Samantha
Your jean purse creation is cute and very creative. keep up the good work with your purses and tutorials. Samantha K.
November 12, 2009 at 11:55 am
Samantha
Your jean purse is cute and the yellow band highlights it nicely. Keep up the good work with your purses and tutorials. Nice job. Samantha
November 12, 2010 at 12:13 pm
samantha
I saw your jean purse and I need some help with one I am sewing for my daughter. I began this purse some time ago and it is left just sitting. The problem is that the purse is saggy and baggy, yet the material from jeans was a young woman’s skirt and in good shape. The purse is not large but of average size and I thought that it would look great! i even put a lining ( cotton) in it and the dang thing bags! I even ironed some heavy interfacing on the inside and it still did not hang right. I even tried ironing on some heavy interfacing with a filler in it ( web interfacing?) Anyway, this stuff would not stick to the jeans. I have had a miserable time with this purse thinking it would be a joy to make, and instead it has made me miserable and has been a disaster. I care to have this jean purse have some body and not sag and bag where the wearer of this purse would feel uncomfortable and embarrassed showing off in public. can you help me? Disgusted disaster
November 13, 2010 at 2:40 pm
sewandsew
My purse used a child’s jeans, It is not stiff and I used tissue paper so it would stand up. You could use Timtex or Peltex 70 which is very stiff but if you have several layers to sew through you might go through a few needles.
January 29, 2014 at 2:45 pm
Recycled Jean Purse @Love-To-Sew.com
[…] Get the free purse pattern here […]
July 8, 2016 at 9:53 am
Kavita
Thanks for this informative tutorial. I have been stiching bags ad a hobby but using the jeans waist as the bag itself was so innovative. There are very minute things in your tutorial which will help when I stitch a bag in future
March 5, 2022 at 9:00 am
17 Upcycled Denim Jeans Bag And Purses - DIYS
[…] sewandsew […]